Why choose PowerFence?

PowerFence is the perfect addition to the home as it can be rendered or painted to enhance any home design, and routed to create different looks and finishes. Non-combustible, PowerFence is perfect for bushfire zones and it contains steel with an anti-corrosion protection layer for maximum strength and durability.

Create more privacy for your home and reduce external noise by using PowerFence as boundary fencing or as a beautiful fence for your home.

More About PowerFence

How to build a PowerFence

Hebel PowerFence is an innovative alternative to a traditional brick fence. Easy to install, affordable and attractive – it’s perfect for your next DIY project.

Providing an effective noise barrier in residential applications, the PowerFence system can be used for boundary fencing and low front walls, to create a sense of privacy.

The system is a modular masonry structure, consisting of lightweight panels and steel posts, which can be easily and quickly erected without the need for expensive, extensive excavation or strip footing, as is normally the case with masonry fence construction. Using specially designed PowerFence brackets, the system can be configured in a variety of ways and allows for easy installation of corners and accommodates for panels to be ‘stepped’ for sloping terrains.

Hebel PowerFence can be finished in an expressed or monolithic finish and panels can be routed to create decorative designs. The system is also flexible enough to be adapted to include a range of different decorative treatments such as timber panels or ironwork.

Step-by-step guide:

Refer to Table 1 below.

This table is a general guide based on broad soil types and terrain categories. We recommend you consult a relevant engineer or local authority to confirm relevant soil type and the terrain category / wind loads in your area.


Note:

  1. Wind loads in the table are in compliance with AS1170.2-2011
  2. Post Section to be SHS 3500mPa Grade to AS1163.
  3. ‘Free end’ denotes within 2xh length from the end of wall, including gap and gate in the all,
    ‘Corner End’ denotes within 2xh length at a corner with a return wall; ‘General’ denotes all other situations.
  4. Pier footing is 300mm dia. Grade 20mPa concrete with steep post embedded to within 50mm - 100mm fromthe bottom of pier.
  5. If soil conditions is encountered other than specified in table, specialist advice is required.

Mark out the entire fence project on your property measuring the post spacings along this alignment.

The standard PowerFence system is designed for 1800mm long panels, requiring post spacings of 1885mm, from post centre to post centre.

PowerFence bay lengths can be less than 1800mm, and under more strict conditions (see Table 1), increased to an absolute maximum of 2400mm panel length.

For other bay sizes, the post set out (centre to centre) is always the panel length in mm, plus 10mm (5mm space at each panel end) plus 75mm. For example - a maximum length 2400mm panel post set out would be 2485mm centre to centre.

Fig. 3.1

Dig 300mm diameter post holes ensuring correct hole depth for the required post embedment. See Table 1 for details. Place posts in holes ensuring each post is plumb, holding posts in place with temporary supports.

Fig. 3.2

Pour in concrete around the post bases up to ground level, allowing concrete to set. PowerFence Posts are supplied as 2400mm long for an 1800mm exposed fence height and a minimum 600mm embedment.

Note: If embedment requirements exceed 600mm then simply fix an 800mm length of Power Fence 65mm x 65mm x 2.5 SHS post extension, using screws or bolts (Fig 3.4).

Fig. 3.3

Slide the extension into the PowerFence Post, and adjust the extension to protrude from the base of the PowerFence post to ensure the total embedment depth required. The extension must have a minimum 300mm inserted into the PowerFence Post.

Fig. 3.4

Ensure the extension is screwed or fixed on at least two sides of the PowerFence Post (Fig 3.4).

Fig. 4.1

Place a string line along posts at the base level of the fence (Fig 4.1). Turn a PowerFence Bracket upside down to form the cleat position. Put this over the top of post, sliding it down the post so the base of the cleat plate is in line with the string line.

Fig. 4.2

Fix off the cleat to the post with screws (Fig 4.2).

Fig. 4.3

It’s best to only fix cleats one bay ahead of the bay being installed, allowing for minor adjustments as the fence is built (Fig 4.3).

Fig. 5.1

With the starting cleat in place on both posts of a fence bay, the first PowerPanel can be installed.

Place the PowerPanel on the cleats and have another PowerFence Bracket ready in the normal lateral-fix position (Fig 5.1).

Fig. 5.2

Slide bracket down the post and drop over the top of the first panel to temporarily lock the panel to the post and stop the panel from falling either side. There’s no need to permanently fix any lateral brackets with screws until just before installing the final post covers (Fig 5.2).

Fig. 5.3

Continue to install panels along the fence using a notched trowel bed of Hebel Adhesive between the horizontal joints of all panels (Fig 5.3 & 5.4).

Fig. 5.4

PowerFence can be built a single bay at a time, but it’s generally easier and faster to install each row of panels along the entire fence length at a time.

Fig. 5.5

When building PowerFence a bay at a time it is important to slide both sides of the brackets on to the posts as each panel is stacked in the bay. This way the PowerFence Bracket is already in the right place for the next bay. (Fig 5.5 & 5.6).

Fig. 5.6

These brackets are then simply lifted by sliding up the post and dropping over the panels as the next bay is installed (Fig 5.5 & 5.6).

The PowerFence Bracket system is designed as a pair, with both brackets identical except one has an upper arm and the other a lower arm to connect to the post. This is so the brackets can be combined in a range of configurations - from normal level ground, around corners and sloping ground.

NOTE: PowerFence has a maximum height of 1800mm and normally 3 x 600mm wide PowerPanels are stacked horizontally. For any height over 1800mm, an engineer must be consulted for a specific design of both the post and the supportive base cleat.

When building a fence at a 90° corner simply follow Fig 6.1, 6.2 and 6.3.

Fig. 6.1
Fig. 6.2
Fig. 6.3

For sloping ground fix the PowerFence Bracket starting cleat in the correct position to follow the sloping terrain.

The vertical step between each bay shouldn’t exceed 200mm (approx 15 degree slope).

When installing on sloping ground it’s important to follow a set sequence with each PowerFence Bracket pair ensuring the correct ‘ready’ position of a bracket for the next bay.

When climbing sloping ground, always install the lower arm bracket first, then slide the adjacent upper arm bracket down the post and leave unfixed. It can then be lifted to fit over the panel in the next ‘higher’ adjacent bay. Conversely, when descending a slope, slide the lower arm bracket over the post first and leave loose. Then drop the upper arm bracket over the panel being installed. This way, the lower arm bracket is already in position to accept the panel in the next adjacent ‘lower’ level bay.

Angle turns are achieved by embedding two posts close together at the required turn of angle and installing the panels at the splayed corner like an end bay. The two closely aligned posts are then fully covered on both sides using PowerFence Post Covers and screw fixings.

Fig. 7.1

After the fence is assembled and all the panels glued together, complete all bracket connections by screw fixing the bracket arms to posts using two screws for each side.

Fix the PowerFence Post Covers over the PowerFence Bracket arms and screw fix the post covers directly to the post using the 10-24x40mm countersink head screws. Pre-drill and countersink pilot holes into the compressed fibre cement post covers prior to screw installation - so the screw heads finish flush with the post covers.

Use 150mm vertical screw spacings at all corners and end posts, and 150mm centres on other intermediate posts.

For end bays simply finish with a PowerBracket set on the PowerPanel side of the end post. Then cover all three exposed sides with PowerFence Post Covers, screw fixing the end post cover to the post at 150mm centres.

This completes the structural system for each post.

To make installation easier, pilot holes can also be drilled in the steel posts before fixing screws, using the countersunk drilled post covers as a template.

On sloping ground it may be necessary to place an additional cut section of post cover to ensure the stepped panels are completely covered.

Post covers are made from thick fibre cement, and therefore can be cut using the same diamond turbo blade on a circular saw as the Hebel PowerPanel. The post covers should be cut slowly, passing along the cut several times and increasing the cut depth of the saw by a few mm on each pass. Always use a guide fence with the saw to ensure straight neat cuts.

Note: Hearing and respiratory protection is also necessary during cutting.

Fig. 8.1
Fig. 8.2
Fig. 8.3
Fig. 8.4

There’s a variety of ways to decoratively complete PowerFence.

Panels can be easily capped and strengthened using 76 x 50 galvanised ‘U Channel’, which is placed over the top of each panel and glued into place with construction adhesive.

Ensure there is 5mm of expansion space at the ends of each capping length, as with the panels (Fig 8.1).

To finish the tops of posts, a 600 x 200 x 50mm Hebel block can be used.

Cut in half to make a 300 x 200 x 50mm cap, glue and screw fix over the post.

When fixing post caps into the Hebel panel use a 100mm, 14-10 bugle head type 17 screw.

Pre-drill the post cap, glue the post cap down with Hebel Adhesive and screw fix into place (Fig 8.2, Fig 8.3, Fig 8.4).

Fig. 9.1

PowerFence can be finished using either roll on flexible exterior paints or texture coat finishes.

If a supportive galvanized panel capping has been used then no further protection along the top of the panel is required. However, if the PowerPanel itself is the top edge of the fence, Hebel recommends the top of all panels and 100mm either side of the panel from the top, be first coated with an exterior grade waterproofing compound.

This should be compatible with the final coating system. It will further protect the panel from water ingress, maximizing the life of the coating system used.

Materials required:

Shopping List


Tools Required

What components you'll need

  • PowerPanel for fence panels
  • The primary component of the standard PowerFence system is the 1800mm long by 600mm wide and 75mm thick, steel-reinforced Hebel PowerPanel.

  • PowerFence Bracket
  • The Hebel PowerFence Bracket acts as the supportive cleat for base panels and tPowerFence post extensionshe lateral restraint for all other panels as they are positioned between posts.

  • PowerFence Capping
  • For maximum weatherproofing and a stronger finish to the top edge, PowerFence panels can be quickly and simply capped with a purpose made, galvanized steel, 76 x 50mm ‘U’ shaped capping channel

  • PowerFence Posts
  • PowerFence Posts are 75mm x75mmx 2.5mm galvanized box section steel. They are supplied in a standard 2.4m length to suit up to a 1.8m high fence when anchored in 600mm deep concrete bedded footings.

  • PowerFence Post Extensions
  • Where deeper footings are required a post extension piece is available. This easily connects to the base of a standard PowerFence Post.

    Note: Extension pieces are only used to increase the embedment depth of the post in the ground – the maximum fence height for standard PowerFence posts is always a max. of 1800mm.

  • PowerFence Post Covers
  • To complete the structural design of PowerFence, sturdy 15mm compressed fibre cement panels are screw fixed onto each side of the steel posts. These complete the structure and also decoratively cover the PowerFence Brackets to create an attractive ‘engaged pier’ appearance that further emulates the look of a solid masonry fence.

  • Hebel Capping Blocks for PowerFence Posts
  • To cover the tops of posts Hebel manufactures 50mm thick solid capping blocks. Simply cut and fix to the top of the fence panels next to the post and create a solid ‘capital’ over the fibre cement covers.

  • Screws
  • 1. 10–24 x 40mm: self-drilling metal screw, countersink head. For connecting bracket to post and post cover to post.

    2. 14-10 x 100mm: needle point screw, bugle or hex head. For any fence capping to Hebel panel connection.

  • Hebel Adhesive
  • 20kg Bags – for glueing together of all Hebel components, both panels and blocks

  • Hebel Patch
  • 10 kg bags. For repair of any holes or construction damage to Hebel blocks or panels - prior to final coating

  • Construction Adhesive
  • Selleys Liquid Nails or Fullers Max Bond – for glueing metal fence capping and post covers to metal posts.

  • Hebel Anti-Corrosion Paint
  • For protection of any exposed reinforcing steel when cutting panels

  • Decorative coatings
  • Hebel PowerFence should be finally coated with a flexible exterior acrylic paint or render system

  • Bagged concrete
  • To cement posts into the ground.


Where to Purchase

You can purchase Hebel PowerFence at selected Bunnings and Mitre 10 stores


Safety information

As with all cementitious products, the user should take all precautions associated with cutting concrete. These precautions include: P1 or P2 class respirators (for fine dust from powered cutting tools), eye protection and ear protection, as well as long sleeved clothes and gloves, as dust could irritate the skin. Hebel recommends reading all relevant Material Safety Data Sheets (MSDS) prior to working with Hebel products.

Download Instructions

How to build a Hebel PowerFence

The innovative alternative to brick makes masonry fencing easy and affordable - and an ideal fencing system for DIY.

Download

FAQ's

Can I install PowerFence on sloping or uneven ground?

YES. Simply fix the PowerFence Bracket starting cleat in the correct position to follow the sloping terrain. The vertical step between each bay shouldn’t exceed 200mm (approximately 15 degree slope). For full instructions see Step 6 in the DIY Guide.

Can I change the direction of PowerFence to any angle?

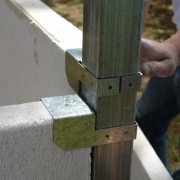
YES. You can achieve angle turns by embedding two posts close together at the required turn of angle and installing the panels at the splayed corner like an end bay. The two closely aligned posts are then fully covered on both sides using PowerFence Post Covers and screw fixings.

Can I use PowerFence as a retaining wall?

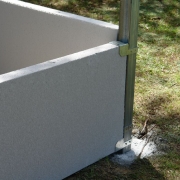
NO. Although the backfilling of light soils along the base is permitted, PowerFence isn’t suitable as a structural soil retaining wall. The reason is straightforward - PowerFence is made of autoclaved aerated concrete (AAC) which is too lightweight to be an effective long-term structural barrier against the high mass and pressure of deep, wet soils or clay.

Can I place PowerFence panels directly onto the ground?

YES with waterproofing. The base of the fence should be coated with a suitable exterior waterproofing compound. This is to protect the panel in the long term, and importantly, maximise the life of the coatings you use to complete the fence./p>

Can I install PowerFence higher than 1.8m in height?

YES with engineering consultancy. The standard PowerFence system is engineered to a maximum 1800mm (or 6ft) height when using the PowerFence Post and three standard 1800 x 600 x 75mm PowerPanels, slacked horizontally. For all fence heights above 1800mm you need to consult an engineer for a specific design of both the post and supportive base cleat.

Is it possible to install PowerFence at lower heights?

YES. PowerPanel can be cut in both length and width to suit lower fence heights if need be. See Cutting PowerFence in the DIY Guide which includes safety notes.

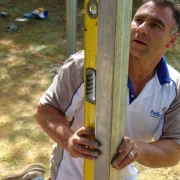
What is the maximum bay length of a PowerFence panel?

PowerFence is designed for the majority of suburban wind loads with an 1800mm bay length. That’s one reason why the PowerFence system uses the standard 1800 x 600 x 75mm Hebel PowerPanel.

Under more strict design conditions, PowerFence can be installed in up to 2400mm bay lengths using the 2400 x 600 x 75mm PowerPanel. For more details see Table 1 in the DIY Guide.

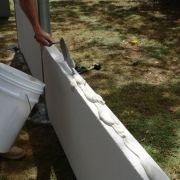
Can I cut PowerPanels on site?

YES with a minimum 270mm width. See the Cutting PowerFence section in the DIY Guide for details. This includes advice on painting any steel reinforcement exposed with Hebel Anti-Corrosion Paint and important notes on working safety with Hebel.

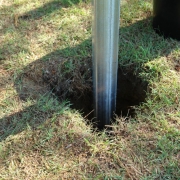
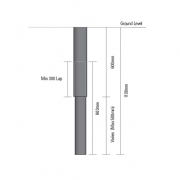
How do I determine my soil type and terrain category for post embedment?

The DIY Guide provides general guidance on broad soil types and terrain categories for PowerFence post embedment. We recommend you contact your local building authority or consult a relevant engineer to find out the type and category for your local area.

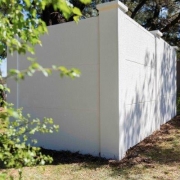
Can I leave my PowerFence unpainted?

NOT BEST PRACTICE. The Hebel PowerPanel is made from aerated concrete with coated steel reinforcing mesh which does absorb moisture. See the DIY Guide on Finishing & Coatings for more information.

Do I need to fully render my PowerFence?

GENERALLY NO. PowerFence does not need a thick, troweled-on render finish unless you want to achieve a very flat, monolithic surface finish similar to fully rendered brickwork. PowerFence is more simply and economically finished by coating with a roll-on coloured acrylic texture coat paint.

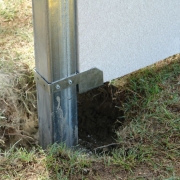
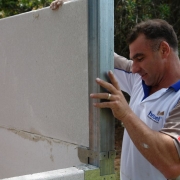
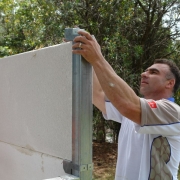
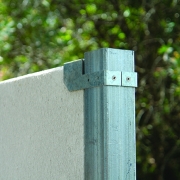
What is special about the PowerFence Bracket?

The PowerFence Bracket is a registered design component (patent pending), which is not only a structural cleat to support the fence panels, but also acts as a lateral support during construction to hold the panels in place immediately after each panel is placed onto the fence. This ensures high safety during installation, particularly for DIY installers.

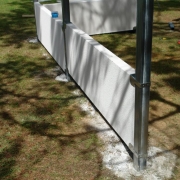
Why do I need Hebel Adhesive between PowerFence Panels?

The Hebel Adhesive between the PowerPanels bonds so they act as a composite fence bay between posts. This maximises the panel strength and ensures the best substrate for final coating.

Is it possible to have different post covers or post decoration?

YES. A range of different finishes can be achieved using Hebel blocks or other decorations, to form a natural chipped stone or engaged pier look to the fence posts. However, the structural fibre cement posts covers must be installed onto PowerFence before any decorations can be applied.

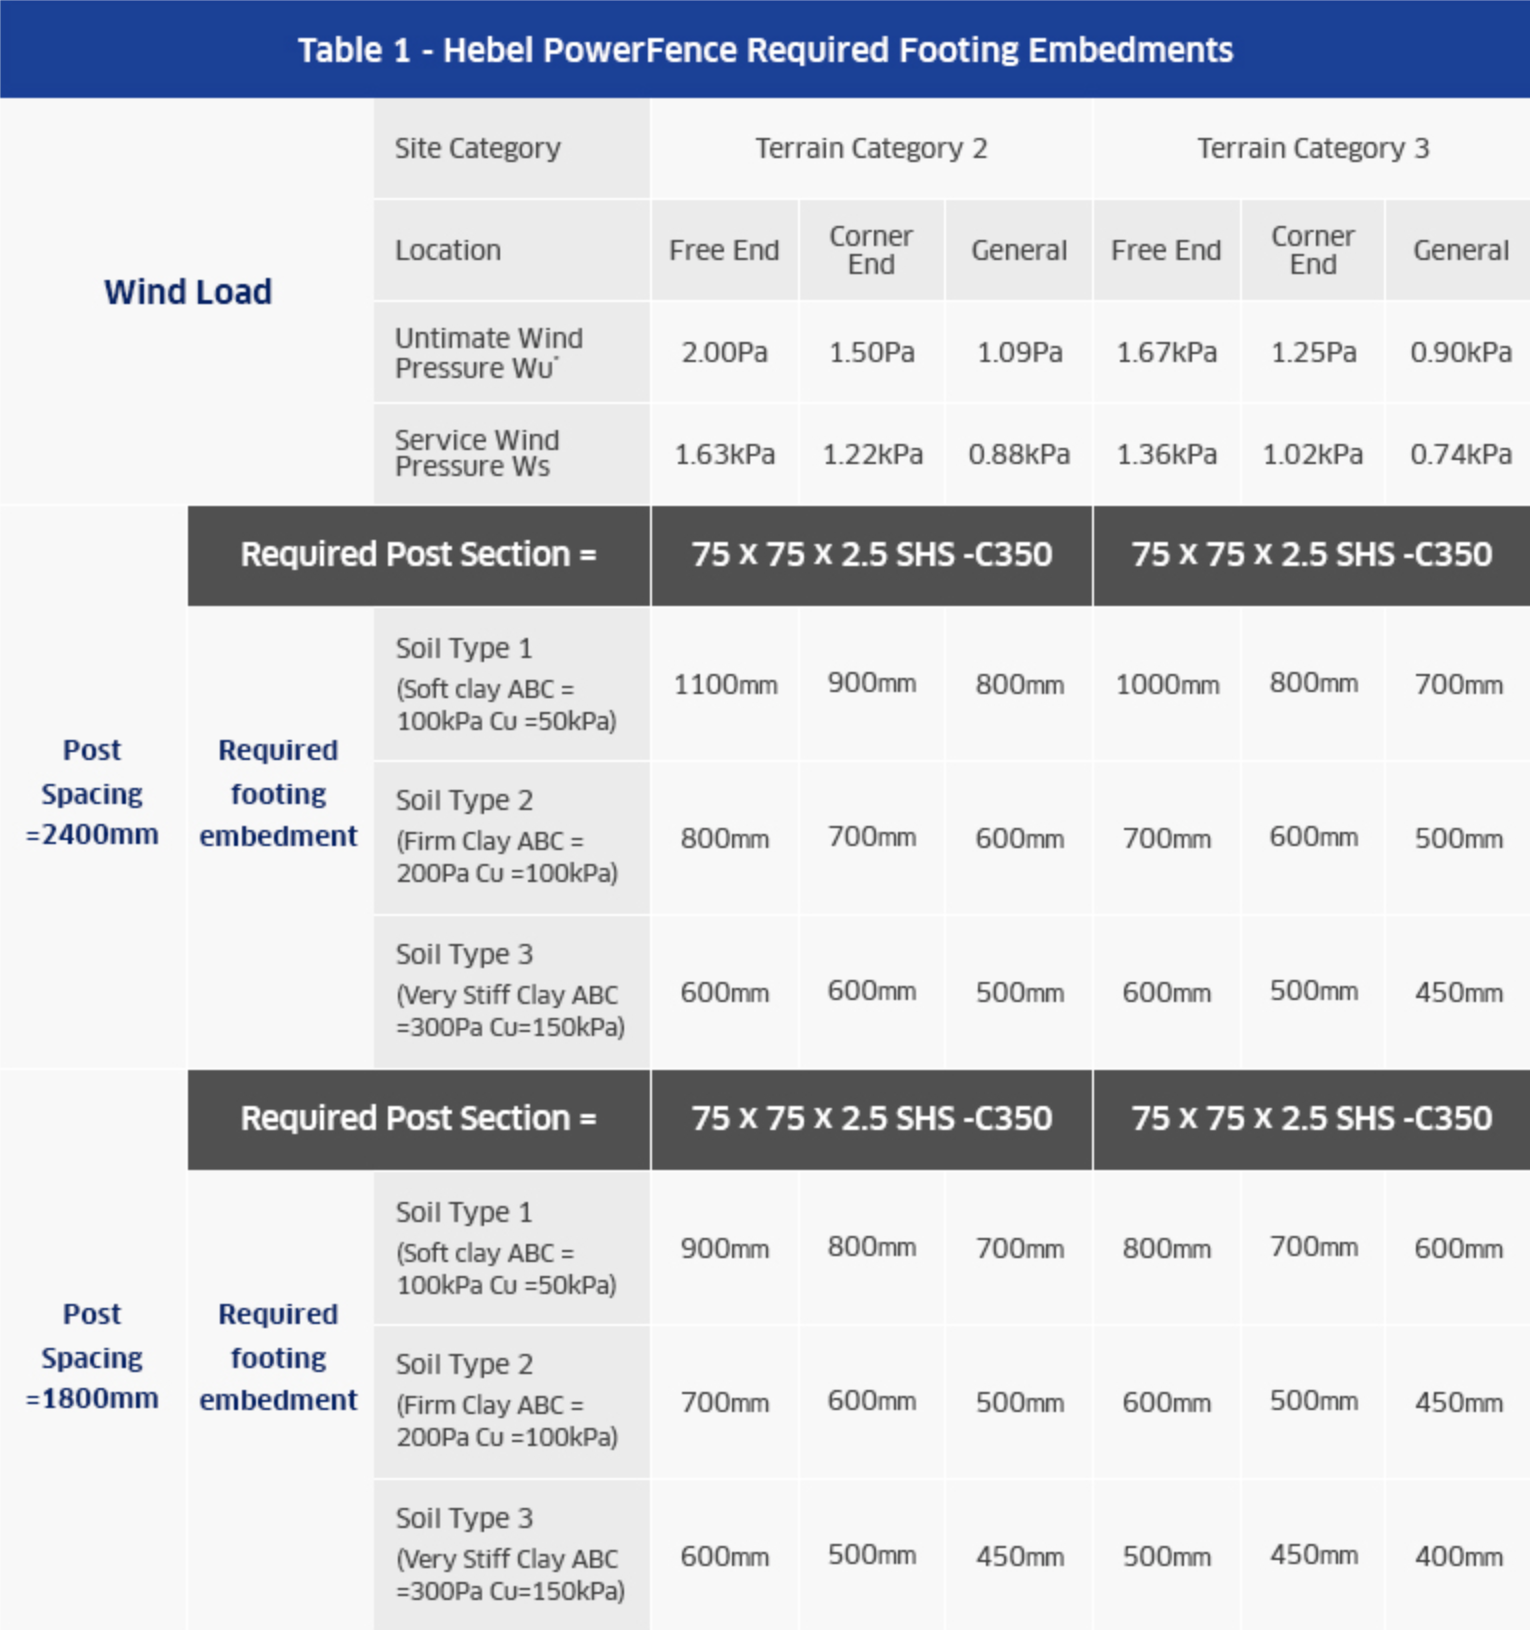
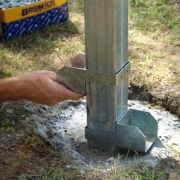
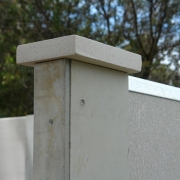
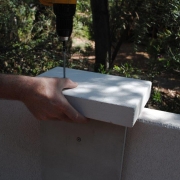
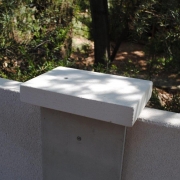
Do I need to cap PowerFence Posts?

YES. The PowerFence Posts are a square hollow section (SHS) steel and can fill with water unless capped. A number of options are possible. The simplest way is to use a 50mm Hebel block as a capping piece. Best practice is to use a knock-in plastic or knock-on steel cap for the 75mm x 75mm post, then attach a solid capping piece for final decoration.

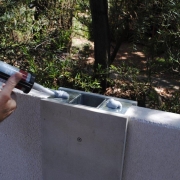
Do I need to cap or treat the top edges of PowerFence panels?

YES. If the PowerPanel is the top edge, Hebel recommends an initial coat of exterior grade waterproofing compound - compatible with the final coating system. It should be applied on the top and down to 100mm either side. This will protect the panel from water ingress maximising the life of the coating system used.

Find a Supplier

To find a supplier click through to the Contact Us and Select your Specialist Reseller or Hardware store.

Contact Us

Subscribe to Hebel Matters.

To stay up to date with the latest Hebel news, articles and feature projects, enter your email to sign up to our monthly e-newsletter.

Subscribe

    Thank you for submitting the form.

    CSR

    Privacy Policy | © 2024 Copyright Hebel.

    Top