


An easy step-by-step project plan showing you how to create a built-in barbeque bench that’s bound to become the hub of your outdoor entertaining.
Size – 2300mm long x 600mm deep. Build to whatever height suits you.
A simple PowerBlock project.

Step by step guide
1 – Cut Blocks

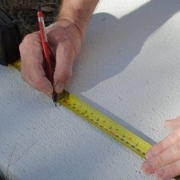 Fig. 1.2
On the concrete slab, mark out the exterior dimensions of the BBQ with a pencil (2300mm long x 600mm deep).
Then mark a line 1200mm in from the outside of one end wall.This is shown on the staggered block layout above.
This line will be the nearer side for the centre blade wall (this will also ensure that both openings either side of the centre blade wall will be the same width).
2 – Damp Proof Course (DPC)
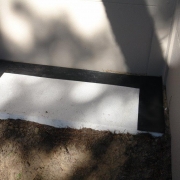 Fig. 2.1
Roll out a damp proof course (DPC) for the Hebel Blocks to sit on.
Ensure the DPC is equal or greater in width than the block wall width, and it is laid along both ends, the back of the BBQ, and along the centre blade wall.
If the DPC is wider than the blocks it can easily be trimmed back with a disposable knife after the walls are laid.
3 – First Course
 Fig. 3.1
Place the first course of blocks onto a bed of Hebel Mortar, which is troweled onto the DPC.
Lay both outside end-wall blocks as full-sized 600mm long blocks, bedding them firmly and level into the mortar.
Use a spirit level and carpenter’s square to ensure the blocks are both level and plumb.
NOTE: Hebel Mortar is only used to bed down the first course of blocks. For all other joints between Hebel Blocks Hebel® Adhesive is used.
Cover the vertical ends of the next block with Hebel Adhesive.
Place mortar along the DPC at the back of the slab.
 Fig. 3.2
Press the blocks together to ensure a good squeeze out of Hebel Adhesive between joints – thereby ensuring blocks are well glued.
Hebel adhesive is a thin bed adhesive, and should only be approx 2mm thick between blocks.
4 – Laying Blocks
 Fig. 4.1
Continue laying blocks in this fashion as you fill in the back wall.
The last block along the back wall will need to be cut to length to suit, then the centre block can be cut back to 500mm long and glued into position.
Hebel Blocks are easily cut-to-size using an old carpenters handsaw, or a special AAC handsaw.
If only a small amount of trimming is required, simply use an old wood rasp and file the block to the required size or shape.
5 – Second Course

 Fig. 5.2
With the first course laid the second course of blocks can be commenced.
Start the end wall this time with a block cut back to 500mm, so the next block along the back wall starts in line with the exterior side of the end wall.
The first back wall blocks will now be offset by 100mm to the block below.
Lay the centre blade wall block as a full-length block so it ties into the outside wall, then lay the remaining blocks, with Hebel Adhesive on all joints, ensuring that the block joints stagger the lower course by 100mm.
Tip: Lay Hebel Adhesive with a notched trowel to get an even bed of adhesive across the entire width of the block.
 Fig. 5.3
6 – Third and fourth course
 Fig. 6.1
Continue laying blocks for the third and fourth course by repeating the same alternate ‘staggered’ block pattern as the first two courses, checking level as you go.
The vertical joints always stagger the lower joints by at least 100mm until you get to four courses high.
Ensure adhesive used between all joins covers the entire width of blocks.
A small amount of adhesive should squeeze out between each join.
Tip: Hebel Adhesive is fast setting, so scrape excess adhesive between blocks just as it begins to harden. The partly cured adhesive is easier to scape cleanly from the wall than fresh adhesive, and removing excess adhesive before it dries will make final finishing and surface sanding of the wall easier.
7 – BBQ Top
 Fig. 7.1
Place a 1200 x 600 x 75mm reinforced Hebel® PowerPanel on top of the blocks on the side that the gas burner is required.
Use Hebel Adhesive to glue the top panel to the blocks, then further secure the top panel to the block walls below with 150mm bugle head screws, using 3 screws on each glued edge of the panel.
8 – BBQ Preparation Area
 Fig. 8.1
The three 75mm thick Hebel blocks can now be cut lengthways in half to make blocks that are 600mm x 100mm x 75mm.
With the manufactured surface of the cut blocks facing the outside of the walls, glue the 100mm wide cut blocks onto the adjacent block wall.
This will increase the height of those walls by 75mm, so the adjacent wall now finishes at the same height as, and flush with, the gas burner panel top.
Once those blocks are glued in place, the remaining 1200 x 600 x 75mm PowerPanel can then be glued and screwed into place (like the gas burner panel) to form the preparation area.
The leftover 75mm thick blocks can now be glued along the side and back of the gas burner panel to form a flush rebate surround for the BBQ.
 Fig. 8.2
9 – Finishing & Coating
 Fig. 9.1
The BBQ is now ready for final finishing and a decorative coating system.
Shape and square-up any misaligned exterior surfaces with a rasp, then sand all exposed wall areas with coarse grit sandpaper.
Use sandpaper to round-off all sharp corners and edges prior to coating.
Any chipped or damaged blocks can be repaired with Hebel Patching compound, and sanded to a smooth finish.
For a full rendered look, it is recommended to use Hebel HighBuild render over the entire exterior of the BBQ, followed by an acrylic primer, and a minimum two coats of Dulux Weathershield for the final flexible coating protection.
For a more rustic texture finish, it is also possible to finish the BBQ in flexible acrylic ‘bagging’ renders, using a glove or texture roller.
Please note: If the BBQ is outside and not undercover, then the bench areas need a waterproofing agent to seal the Hebel before final coating or surfacing. Undercover BBQs do not require waterproofing.
IMPORTANT: THE GAS BURNER INSTALLATION ON TOP PANELS SHOULD NOT EXCEED 100KG
10 – Optional Doors & Tiling
 Fig. 10.1
Optional Doors
Timber boards or exterior plywood doors can be made to cover the openings at the front of the BBQ:
- the opening under the burner area will be approx 800mm H x 1000mmW
- the opening under the preparation area will be approx 875mm H x 1000mmW
Measure both openings accurately after coating the BBQ and construct pairs of doors to suit each opening.
Door pairs should be a minimum of 10mm less in both height and width than the opening size to allow for the doors to swing freely on hinges inside the opening.
Fix a 17mm thick exterior plywood or hardwood strip to the inside block work on each side of the openings. Use 4 of the 100mm long 14-10 bugle head batten screws to secure each strip.
The door hinges can now be fixed to these plywood strips using normal timber screws. It is not recommend to fix any hinges directly into the Hebel block work.
Fix a 17mm thick exterior plywood or hardwood strip to the inside block work on each side of the openings. Use 4 of, 100mm long 14-10 bugle head batten screws to secure each strip. The door hinges can now be fixed to these plywood strips using normal timber screws. It is not recommend to fix any hinges directly into the Hebel block work.
 Fig. 10.2
Optional tiling of benchtops
Tiling is recommended for all horizontal surfaces, as it is ideal for these type of outdoor kitchen projects.
Ceramic tiles will provide a hard working surface that is easy to clean. Ensure the Hebel surface is sanded and cleaned of loose dust. An exterior grade primer should be applied to seal the Hebel surface, and an exterior grade tiling adhesive should be used, as per the manufacturer’s instructions.
- 28 x 100mm thick Hebel Blocks (600 x 200)
- 3 x 75mm thick Hebel Blocks (600 x 200)
- 2 x 1200x600x75mm Hebel PowerPanels
- 1 x 20kg bag of Hebel Adhesive
- 1 x 20kg bag of Hebel Mortar
- 2 x 20kg bag of Hebel HighBuild Render
- 18 x 150mm 14-10 bugle head screws
- (Additional 16 screws to fix optional doors)
- 1 x 10kg bag of Hebel Patching compound (if required)
- 110mm wide poly damp proof course (DPC)
- throw away timber handsaw or AAC saw
- 75mm notched trowel for applying Hebel Adhesive or notched scraper to spread Adhesive
- masonry trowels
- sanding float and very coarse sandpaper
- cordless drill
- electric drill with paint stirrer (for mixing adhesive)
- throw away wood rasp (for shaping and leveling)
- mixing buckets
Safety information
Your health and safety is the number one priority. It’s important to understand how to work safely with Hebel to minimise your risk, and prepare ahead when handling, cutting, sawing, abrading, chasing or crushing Hebel panels and blocks. Please refer to the Working Safely with Hebel page for a guide on best safety practices.
What else can I build with Hebel?
View all


Find a...
We have a network of suppliers ready to help you get your project up and running.